Accès à Cannes 3D
3 étapes
Access to Cannes 3D
3 steps
Etape 1 : Télécharger
Veuillez cliquer sur le bouton « Télécharger » pour installer le visualisateur gratuit Terra Explorer, ce composant est à télécharger une seule fois et ne prendra seulement que quelques minutes selon le débit de votre connexion Internet :
Step 1 : Download
Please click on the button « Download » to install the Terra Explorer free viewer. This add-on program has to be installed once and it will only take few minutes, depending on you bandwith :
Etape 2 : Installation
Exécutez le fichier « GEOCANNES_3D_FR.exe » en cliquant dessus et suivez les instructions.
Step 2 : Installation
Run the « GEOCANNES_3D_EN.exe » file clicking on it, and follow the instructions.
Etape 3 : Accès
Accédez à Cannes 3D en cliquant sur le lien suivant :
Une nouvelle fenêtre va s’ouvrir pour accéder à l’application Cannes 3D.
Step 3 : Access
Access Cannes 3D clicking on the following link :
A new window will appear to access the application Cannes 3D.
Etape 3 : Accès
Accédez à Cannes 3D en cliquant sur le lien suivant :
Une nouvelle fenêtre va s’ouvrir pour accéder à l’application Cannes 3D.
Step 3 : Access
Access Cannes 3D clicking on the following link :
A new window will appear to access the application Cannes 3D.
Ouverture de Cannes 3D
Afin de vous simplifier la navigation, il est recommandé de suivre les instructions définies ci-après.
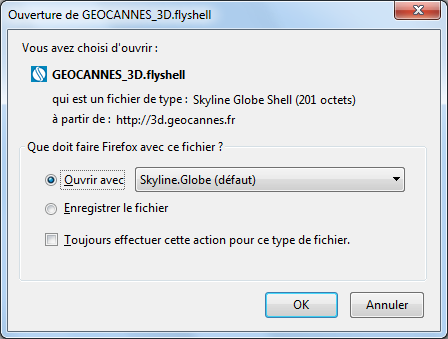
Etape 1 : Ouverture du fichier projet GEOCANNES 3D
Au centre de votre écran, la fenêtre « Ouverture de GEOCANNES_3D.flyshell » va apparaitre.
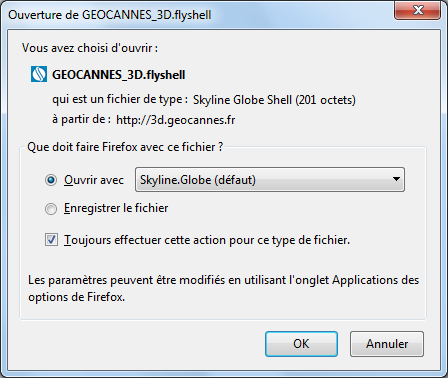
Etape 2 : Ouverture automatique pour vos prochaines connexions
Pour faciliter vos prochaines visites, cliquer sur la case à cocher « Toujours effectuer cette action pour ce type de fichier ». Ainsi votre navigateur lancera automatiquement le projet à votre prochaine connexion.
Cannes 3D opening
To simplify the navigation, it is recommended to follow these instructions.
Step 1 : Run the GEOCANNES 3D project file
At the center of the screen, the window « Ouverture de GEOCANNES_3D.flyshell » will appear.
Step 2 : Automatic running for your next connections
To make your next visits easier, tick the box « Always do this with this type of file ». This way, your internet browser will run automatically the project during your next connection.
Etape 3 : Accès
Accédez à Cannes 3D en cliquant sur le lien suivant :
Une nouvelle fenêtre va s’ouvrir pour accéder à l’application Cannes 3D.
Step 3 : Access
Access Cannes 3D clicking on the following link :
A new window will appear to access the application Cannes 3D.
Ouverture de Cannes 3D
Afin de vous simplifier la navigation, il est recommandé de suivre les instructions définies ci-après.
Etape 1 : Ouverture du fichier projet GEOCANNES 3D
Cliquez sur le fichier « GEOCANNES_3D.flyshell » situé en bas à gauche de votre écran :

Etape 2 : Ouverture automatique pour vos prochaines connexions
Pour faciliter vos prochaines visites, positionnez-vous sur le fichier « GEOCANNES_3D.flyshell » puis accéder aux options en cliquant sur la flèche à droite, cocher ensuite l’option « Toujours effectuer cette action pour ce type de fichier ».
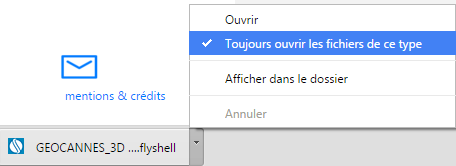
Ainsi votre navigateur lancera automatiquement le projet à votre prochaine connexion.
Cannes 3D opening
To simplify the navigation, it is recommended to follow these instructions.
Step 1 : Run the GEOCANNES 3D project file
Click on the « GEOCANNES_3D.flyshell » file situated at the bottom left of your screen :
Step 2 : Automatic running for your next connections
To make your next visits easier, access to the file options clicking on the little arrow. And then, choose the option « Always open this type of file ».
This way, your internet browser will run automatically the project during your next connection.
Accès à Cannes 3D
Afin de vous simplifier la navigation, il est recommandé de suivre les instructions définies ci-après.
Ouverture du fichier projet GEOCANNES 3D
Au bas de votre écran, la fenêtre « GEOCANNES_3D.flyshell » va apparaitre.
Cliquer sur « Ouvrir », votre navigateur lancera automatiquement le projet 3D.

Cannes 3D access
To simplify the navigation, it is recommended to follow these instructions.
Run the GEOCANNES 3D project file
At the bottom of the screen, the window « GEOCANNES_3D.flyshell » will appear.
Click on « Ouvrir », your internet browser will run automatically the project 3D.